I'm sorry: that title is hyperbolic, but in my defence - titles need to be short.
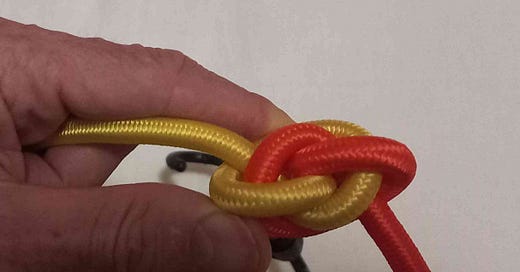
What I really mean is "here is a simple knot1, that in many circumstances is the best knot for joining the ends of two ropes, cords, pieces of twine or fishing line. In fact it could be the most common knot for that purpose ... but for the fact that only a handful of people worldwide seem to know it." (Snappy title, huh)?
Everybody should know a few knots. What is there to lose? This one is pretty simple by any standards, and does the job exceptionally well.
Climbers should know this knot. Obvious caveat: is it prudent to take advice on safety precautions from some random person on the internet? The question answers itself. No, you should exercise your own judgement; experiment with it under a variety of circumstances; get the advice of experts.2 As I said in the introduction to my blog, I don't claim to be an expert or authority on anything: you must just judge what I say on its own merit.
"I’m not telling anyone what to do or think. I’m not even necessarily saying what I do or think. I’m just setting out ideas on a table before you, and if there are any that catch your eye then you can pick them up, try them out, show them to other people, throw them away if you don’t like them - or keep them close to your heart forever - just as you like."
But - back to climbers - especially winter climbers. As a young man I once went on a Winter Mountaineering course in Scotland, at Glenmore Lodge. At the time it was Britain's premier institution for outdoor pursuits, and for all I know, probably still is. We learned about ice-axe arrests3, making different types of snowhole shelters; navigation; climbing frozen waterfalls with an axe in each hand; and plain rock-climbing in Scotland's winter conditions - in days which can be cold, wet, windy, icy, snowy, and when the sun comes up (if you’re lucky!) around 9 a.m., and sets at about 4 p.m. - very short days.
So a recurring theme through the rock-climbing part (as I remember it) was the need for fluency - speed and efficiency without rushing. And all safety considerations are a compromise. Yes, you want your belays - (attaching yourself temporarily to the rock while you tend the rope for a partner) - to be bullet-proof, ideally three separate anchor points, each of which is capable of holding a fall by itself; secure hitches to you; ropes to those anchor points all perfectly adjusted so that the force is distributed equally to each.
On the other hand, you cannot be spending all day searching for the perfect (and non-existent) anchor points, and adjusting your ropes, because time is a huge factor. If you end up having to descend in poor light, in a hurry, or in darkness, that might be a much bigger risk than using only two anchor points for example. There may be a section of the route that you want to get past before the day warms enough to melt the ice and starts rock-falls. Rope handling needs to be ... well fluent again. Connections to anchor points are not necessarily perfect, but very good; attachments to you use hitches that could be more secure, but are fast to tie, and with minimal care are fine; you don't get the rope in a tangle; communication with partners is succinct and effective; decisions are measured but without wasting time.
(For me this is one of the great benefits of climbing: it forces you to become as aware of reality as possible, and forces you
to weigh up the pro's and con's of different ways of doing things;
to get a sound grasp of the idea that there is no such thing as absolute safety;
to appreciate that things you do to improve safety in one way may produce a cost in safety in another way.
With practice and facility in that way of thinking, it might stand you in good stead in the future, supposing - in an entirely hypothetical situation - someone were to come along and say that the safest thing is for everybody to be shut in their own homes. It might occur to you to think "I see the benefit to safety, but what are the costs to safety of doing this"?)
Descending (which is when most climbing or mountaineering accidents occur) might involve a series of abseils (rappels, "raps"). There might be a section where one rope isn’t long enough, and you need to tie two together. The knot which was used (and I believe to a large extent still is) was what was called the "grapevine knot" by Clifford Ashley (who wrote the encyclopedic book on knots for his time - before the invention of nylon and kernmantle) often called a “double fisherman’s knot”.
It's a knot which, of necessity, is very strong and secure. But it's a pig to untie, especially if it has had a hard shock-loading, or you're wearing mittens and have cold hands, and in a hurry. It can take ages to work it loose. And if you are doing it several times, that’s a significant tax on your time, eating away at your limited daylight.
It would be nice if there were a knot which was
simple to tie;
strong (holds a large force);
secure (doesn't come loose when shaken around);
doesn't snag when you drag the rope; and
yet is quick and easy to untie in adverse conditions. It could save significant amount of time and temper, especially in frozen rope, wearing mitts.
Well here is my suggestion, which, for me, meets all those criteria. I've used it for decades, for climbing and other uses, in a variety of materials. That doesn't mean it's safe or easy for you. I don't know whether you will find it easy; nor if you will come up with some way of mis-tying it that I wouldn’t do; nor if you are using some material that I've never used, in circumstances I've not seen.
Here we go. (Now this may seem a bit prolix, and overly meticulous, but I'm trying to explain it so as to remove all possible ambiguity. It's important that climbers can't get it wrong. If I do a really good job, it should be possible to tie it from the description alone, without diagrams. I'll use the word "rope", for lack of a more general term, meaning rope, cord ,string, twine, dental floss ... whatever).
1 You are aiming to tie two ends of rope together. You might be joining two ropes to make a longer one, or joining the ends of one rope together, making a loop. I'll describe joining two ropes.
2 The knot's structure consist of an Overhand knot near the end of each rope, and those knots are intertwined in a specific way.4 We are all familiar with an Overhand knot, even if you don't know the name. It's the simplest possible knot, but I'll tell you how to tie it
.
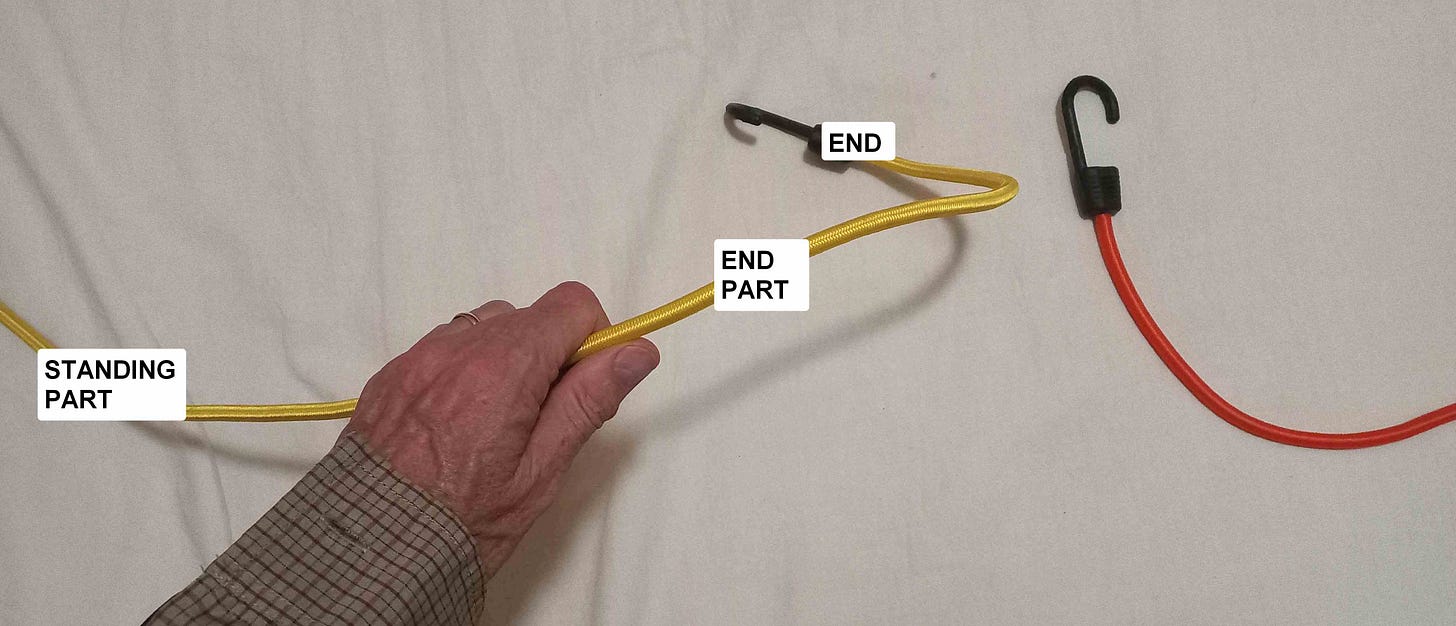
3 There's a rope that disappears off to your left, and you're holding it in your left hand, palm down, near the End but not at the End. For the moment, ignore the rope which you are going to join it to, which goes off to your right. We'll call the larger section of the rope, which is to the left of your left hand, the Standing Part: that's the part you're not using. We'll call the part to the right of your left hand, which goes to the End of the rope, the End Part.5
You are going to tie a loose overhand knot in the End Part. In climbing rope that would need very roughly 70 cm or a yard.
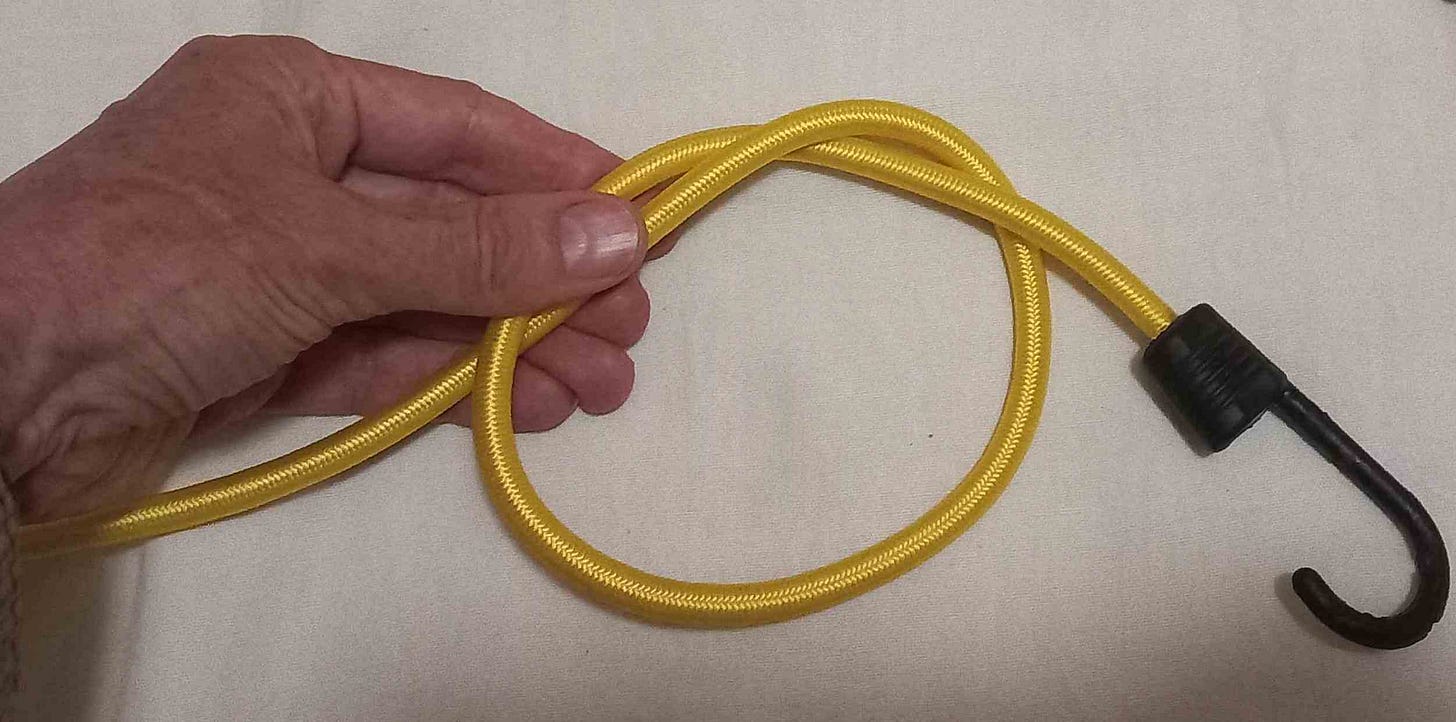
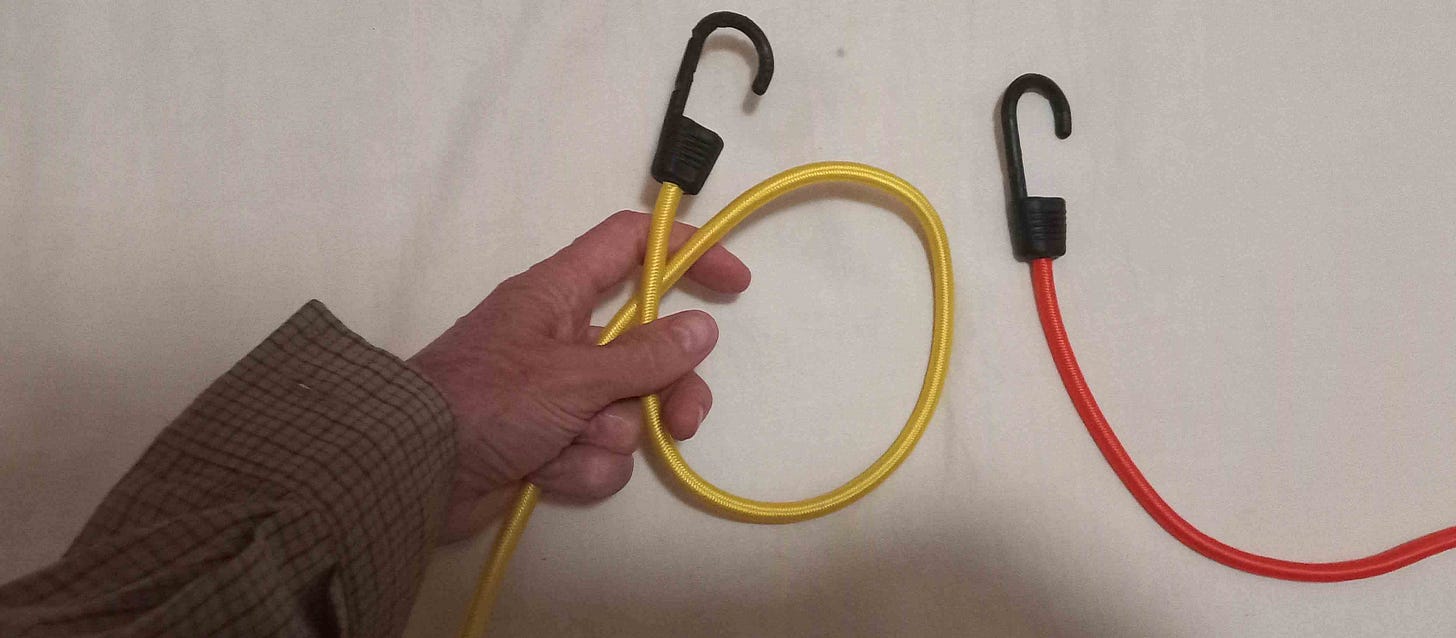
4 So with your right hand, take the End, bend it round in a circle, by bending towards you, then to the left, then away from you and over the Standing Part near your left thumb; clamp it with your left thumb.
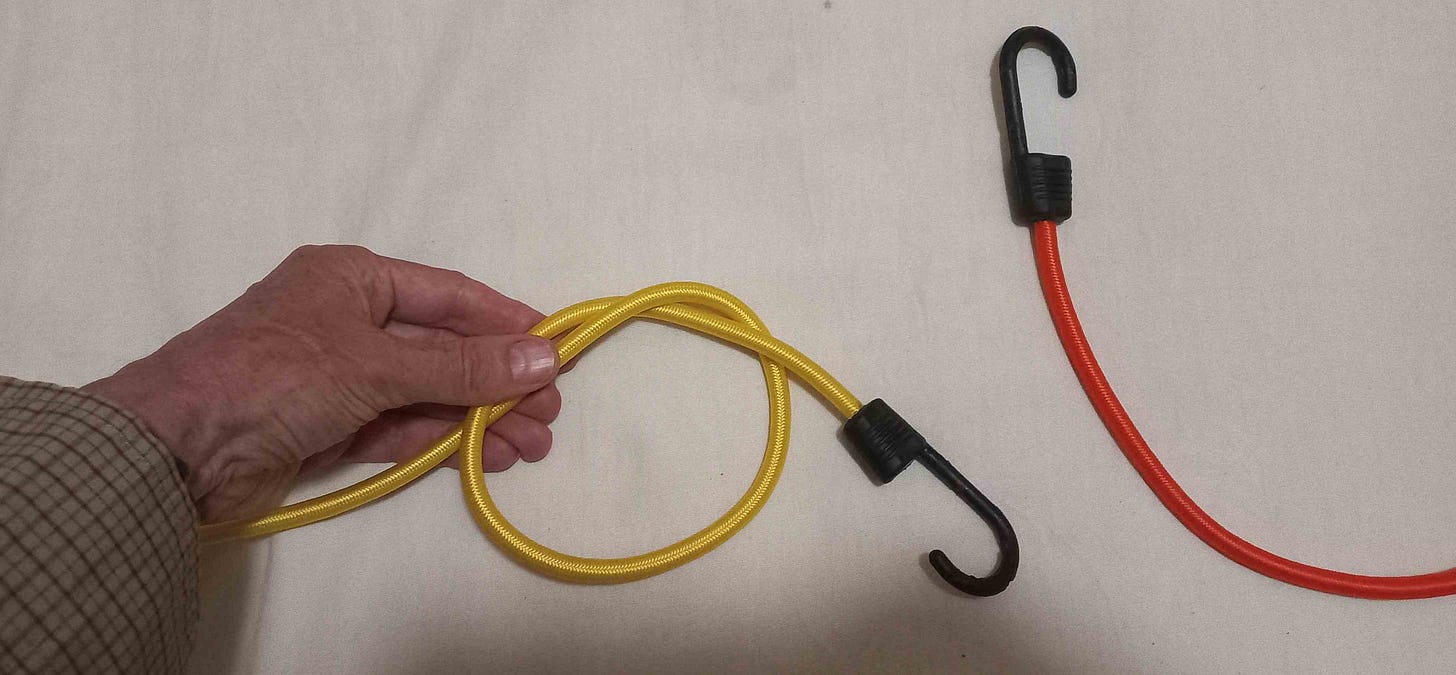
Bend it down around the Standing Part, then put the End up through the loop you have just formed.
Yes that's very simple, but even so there are two features to get clear.
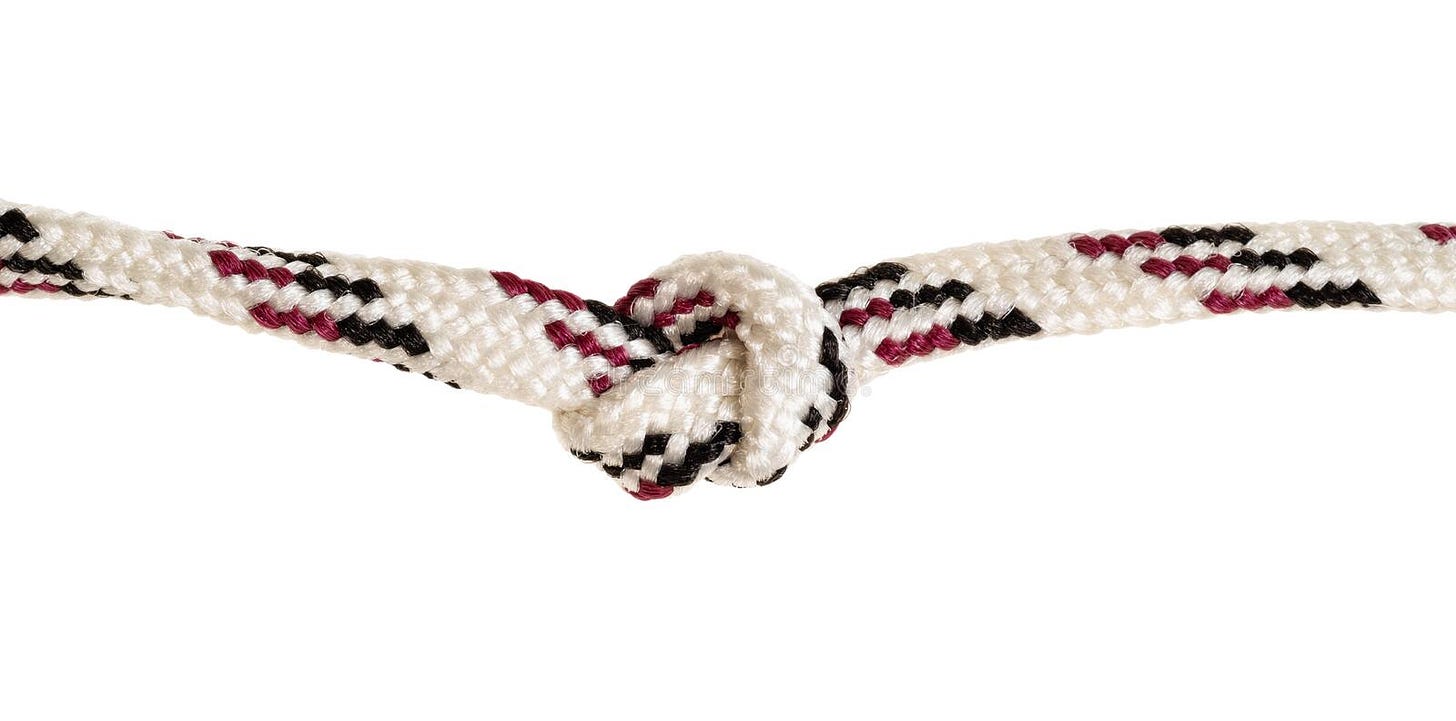
5 First of all, it's not pulled tight yet - getting rid of that big hole. You have a circular shape. Pulling it tight would make a Thumb Knot. You're NOT tying a Thumb Knot. 6
If you haven't got a big hole, say a foot or 20 cm diameter in climbing rope, then make it bigger.
You will be tying an Overhand Knot in each rope: remember at all times that you are going to maintain that large circular structure in each, and not pull them tight. Near the end of the tying you will have to recognise that large hole ... two of them in fact. So keep them large and clear.
6 Second point: just as the gloves in a pair are idendical in some ways, they are different in that they are mirror images of each other. They have opposite "handedness" or "chirality". Similarly there are two versions of the overhand knot, and to follow my instructions you need to have tied the right one for the description which follows.
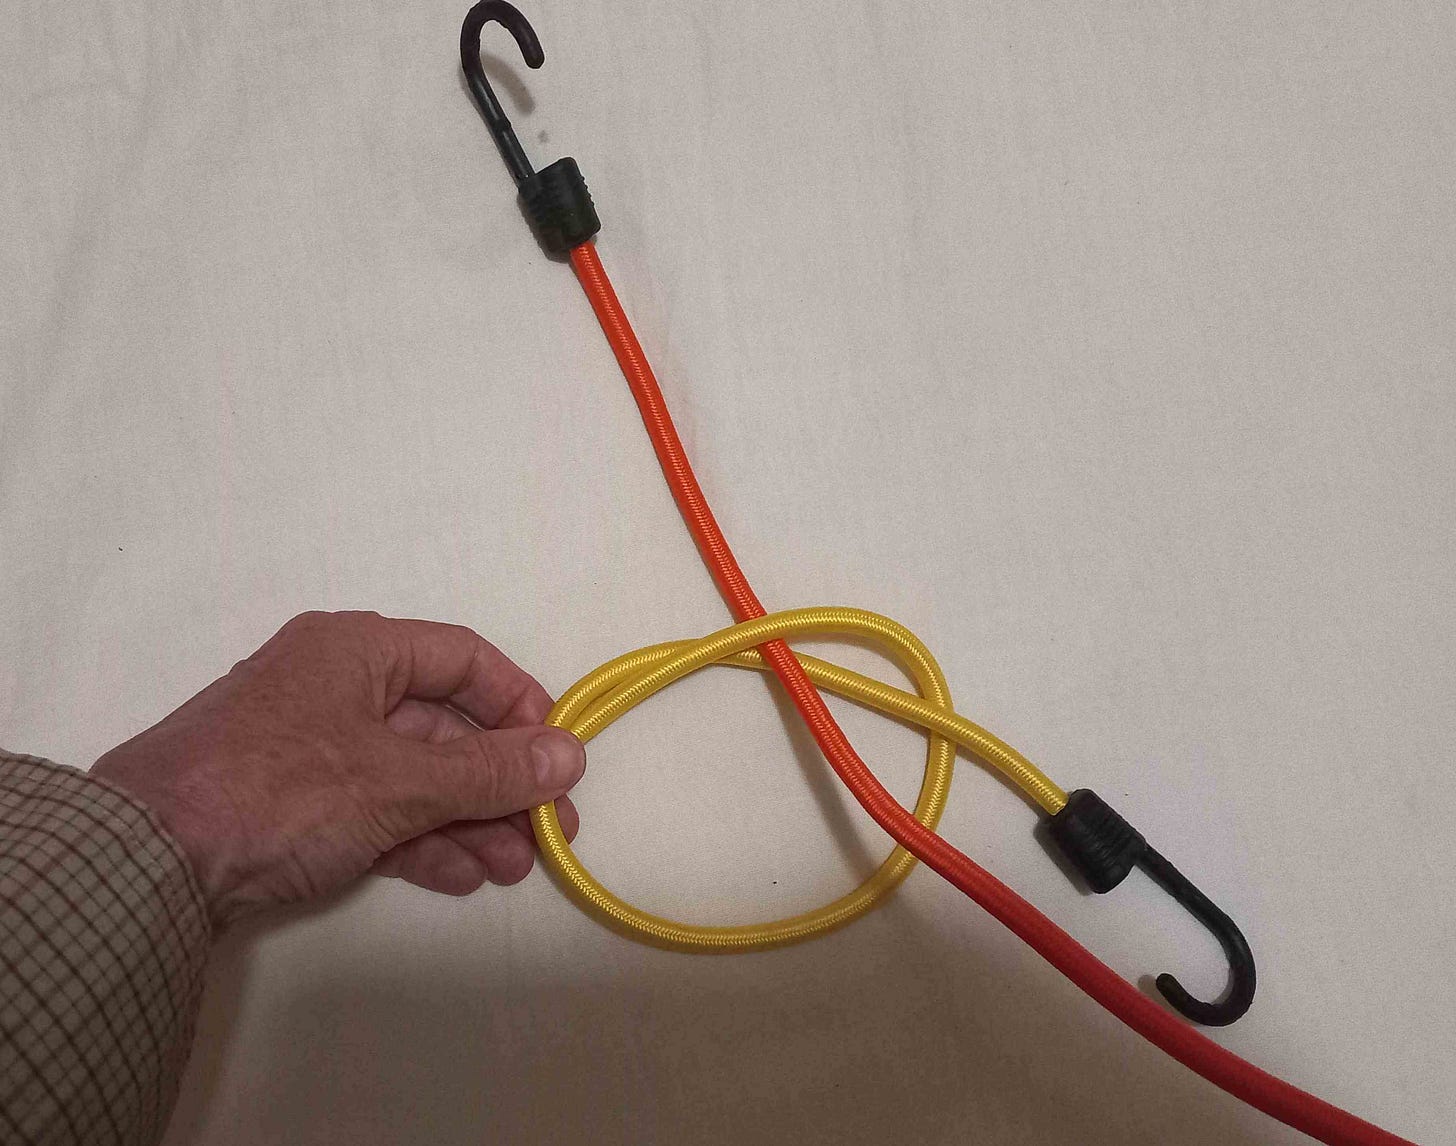
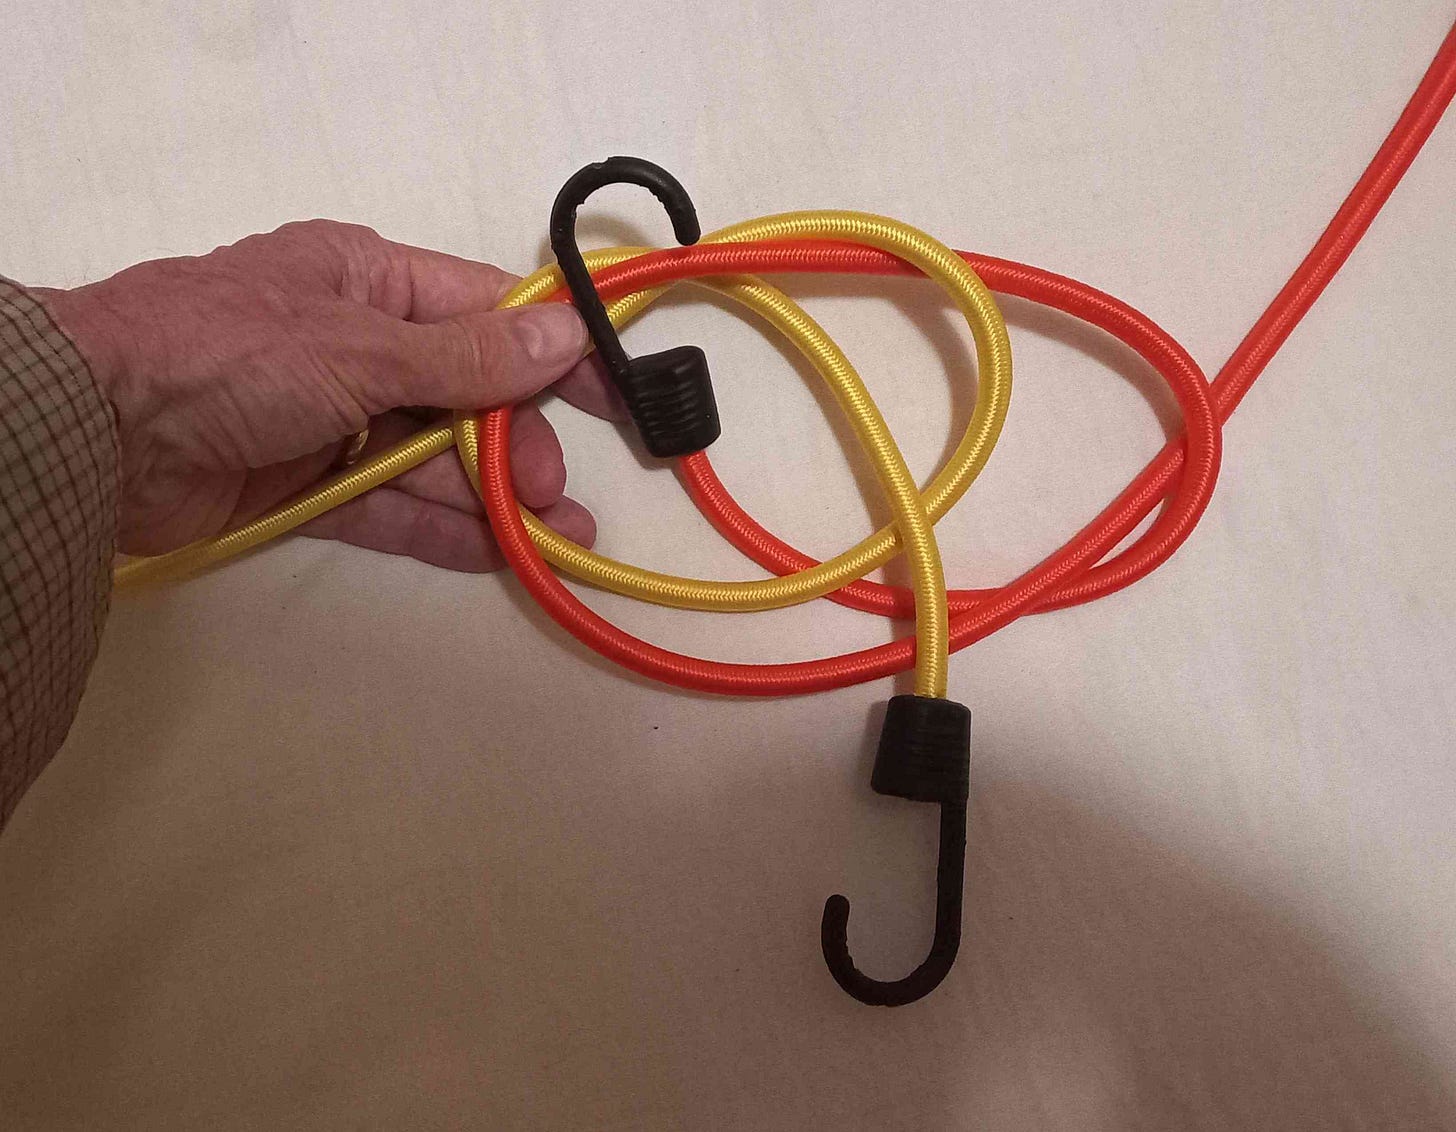
7 So now let's check the situation. The rope to your right is, for now, plain, nothing tied in it. The left-hand rope, has a loose Overhand Knot. Hold it in your left hand by the twist, with the circle in a horizontal plane, like the rim of a cooking pot on the stove. The twist is at the far side of the circle, away from your body. The Standing Part goes off to the left. The End Part emerges upwards from the circle like a stirring spoon sticking out from a pot.
8 Since the final knot consists of two interlinked overhand knots, it's worth noting at this point that you have done all there is to do with the left-hand rope (apart from the final tightening): all action from now on involves doing something with the right-hand rope.
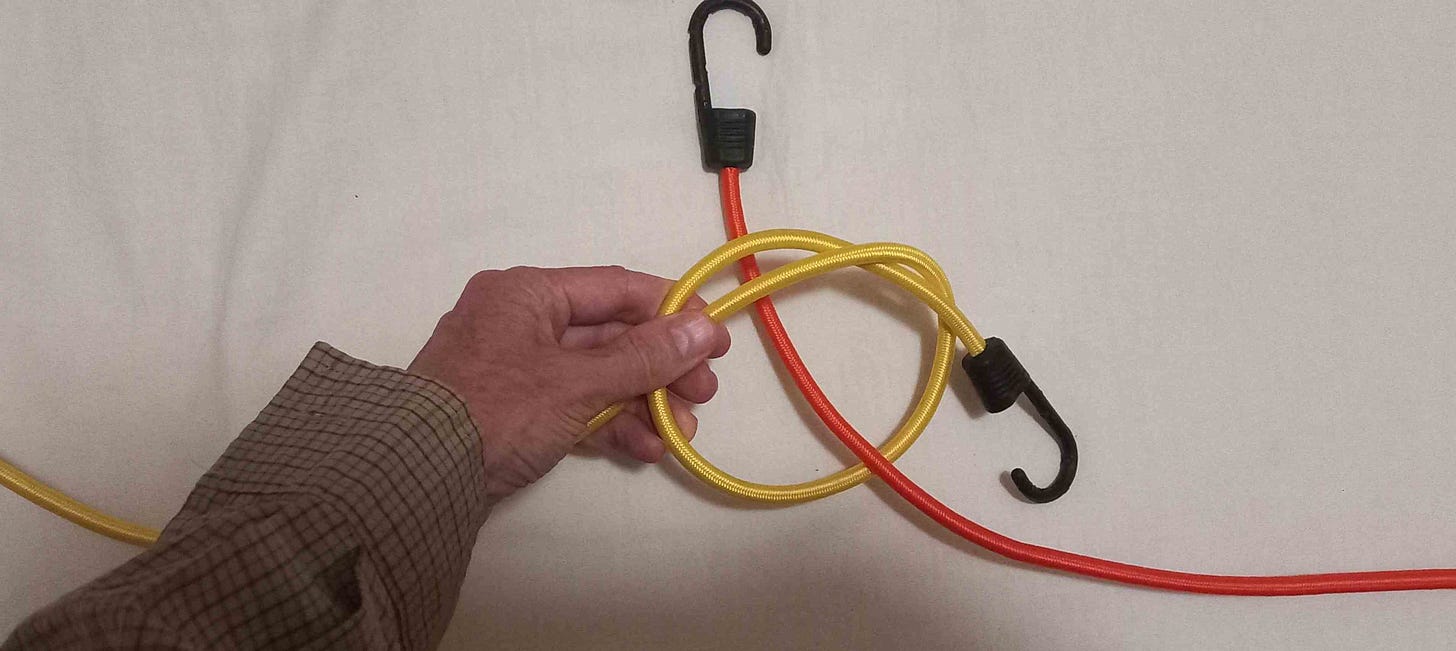
9 Take a generous amount of the right-hand rope in your right hand, and put the End down into the circle, like sticking a second stirring spoon into a pot. To avoid any possible confusion as to which end is which, make the right-hand rope's End Part clearly longer than the left’s.
10 Just check you know which is anti-clockwise, by using the right-hand rope to give a little practice stir in that imaginary pot, in an anti-clockwise direction, looking down on the situation! Do do it! It's muscle-memory that you want when learning knots.
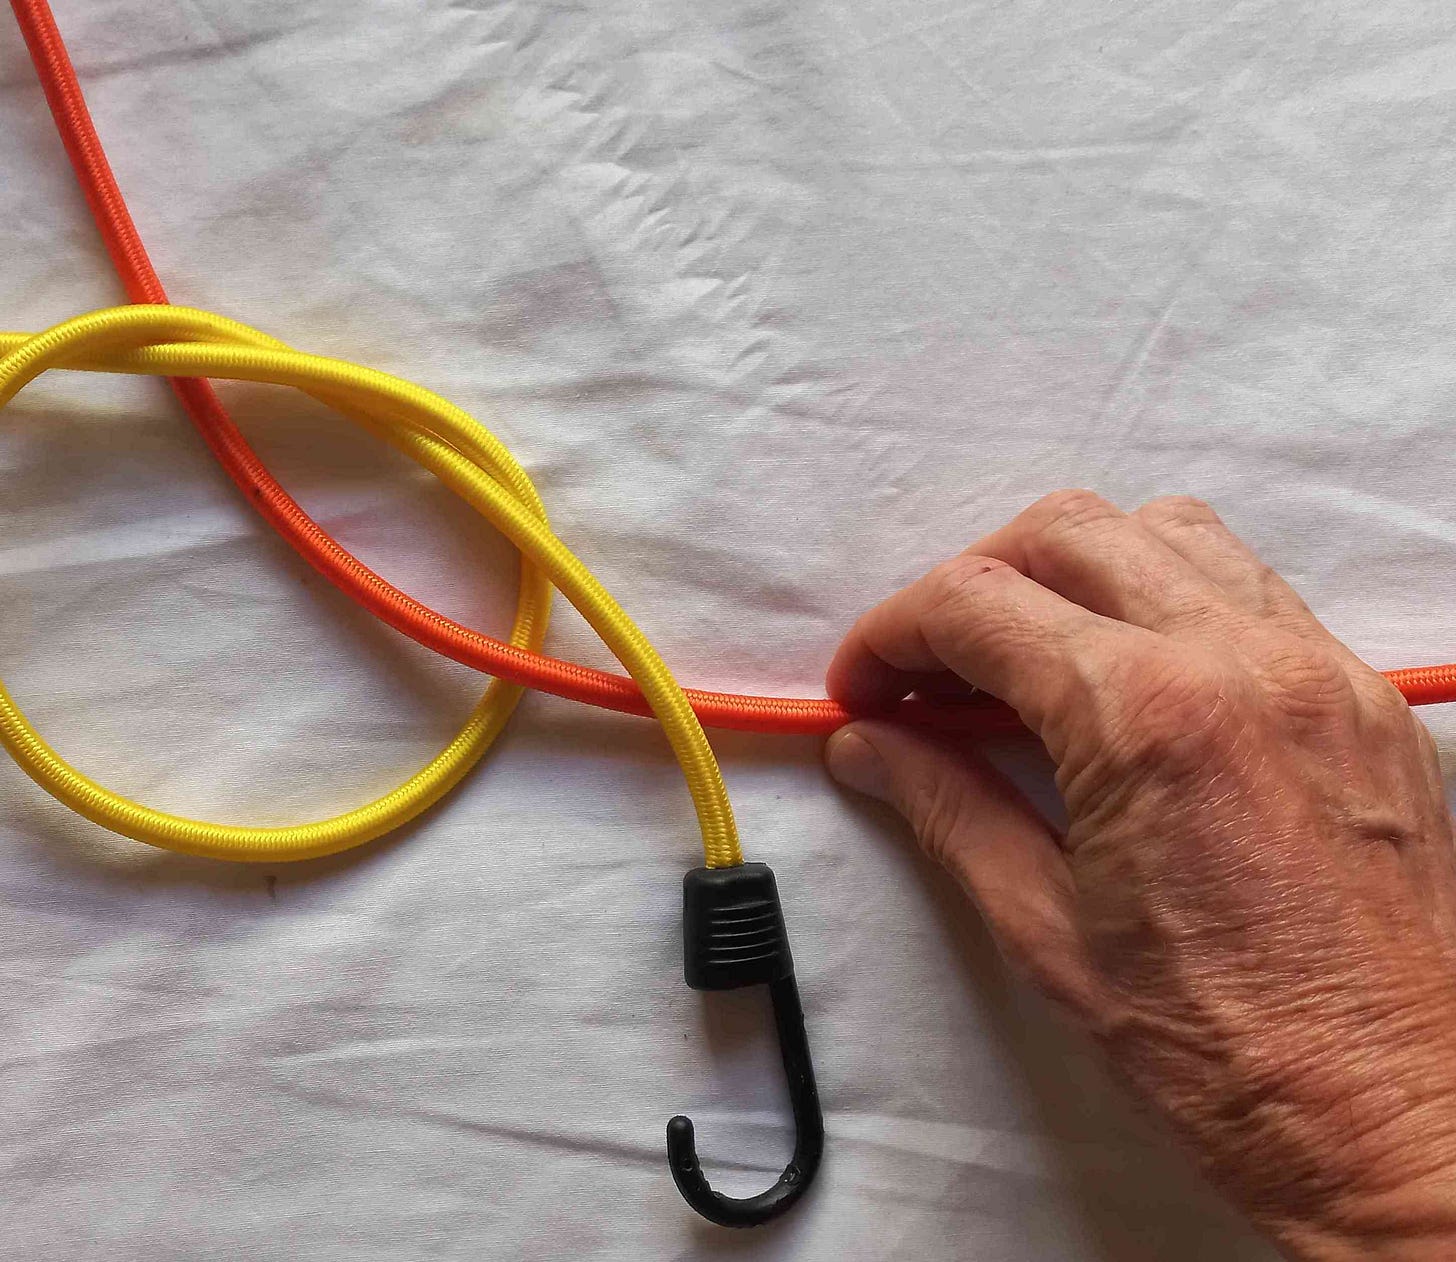
11 This time, as you move the right-hand rope round the rim of the "pot" in a stirring action, slip it under the short end,
so that it gets trapped in the twist.
As your right hand (still holding the right-hand rope) moves round past your left hand, use your left thumb to trap the right-hand rope; so now as your right hand continues to move round it will slide down the standing part of the right-hand rope, and guide the right-hand rope to follow that circular rim.
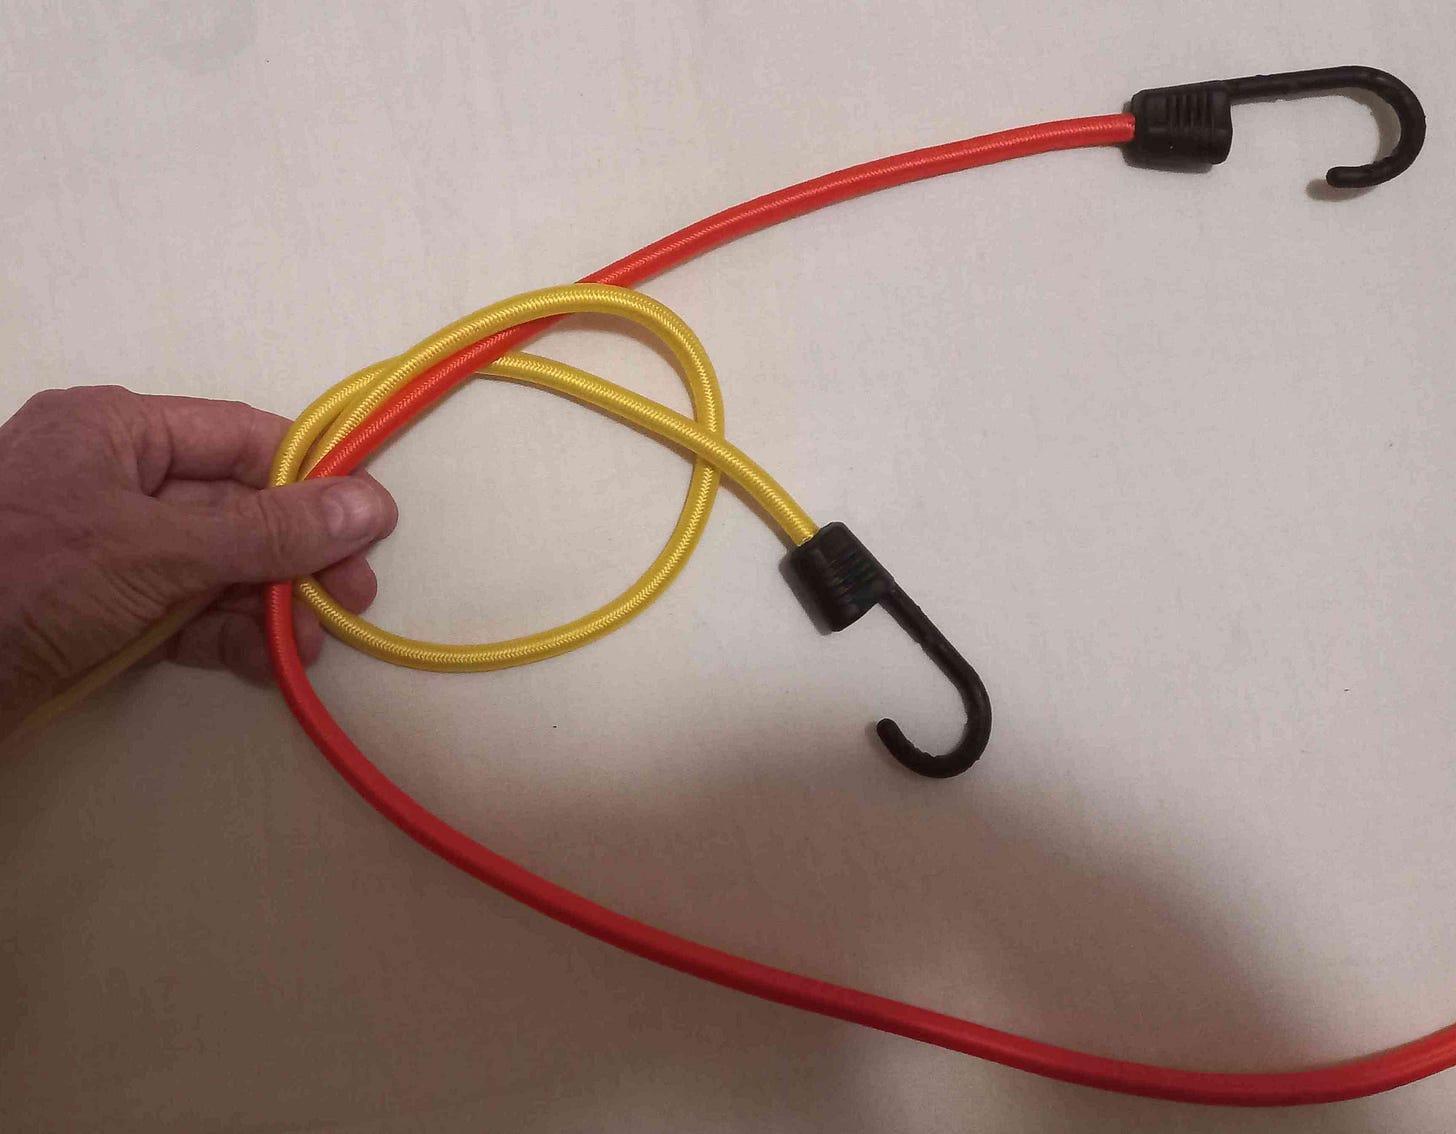
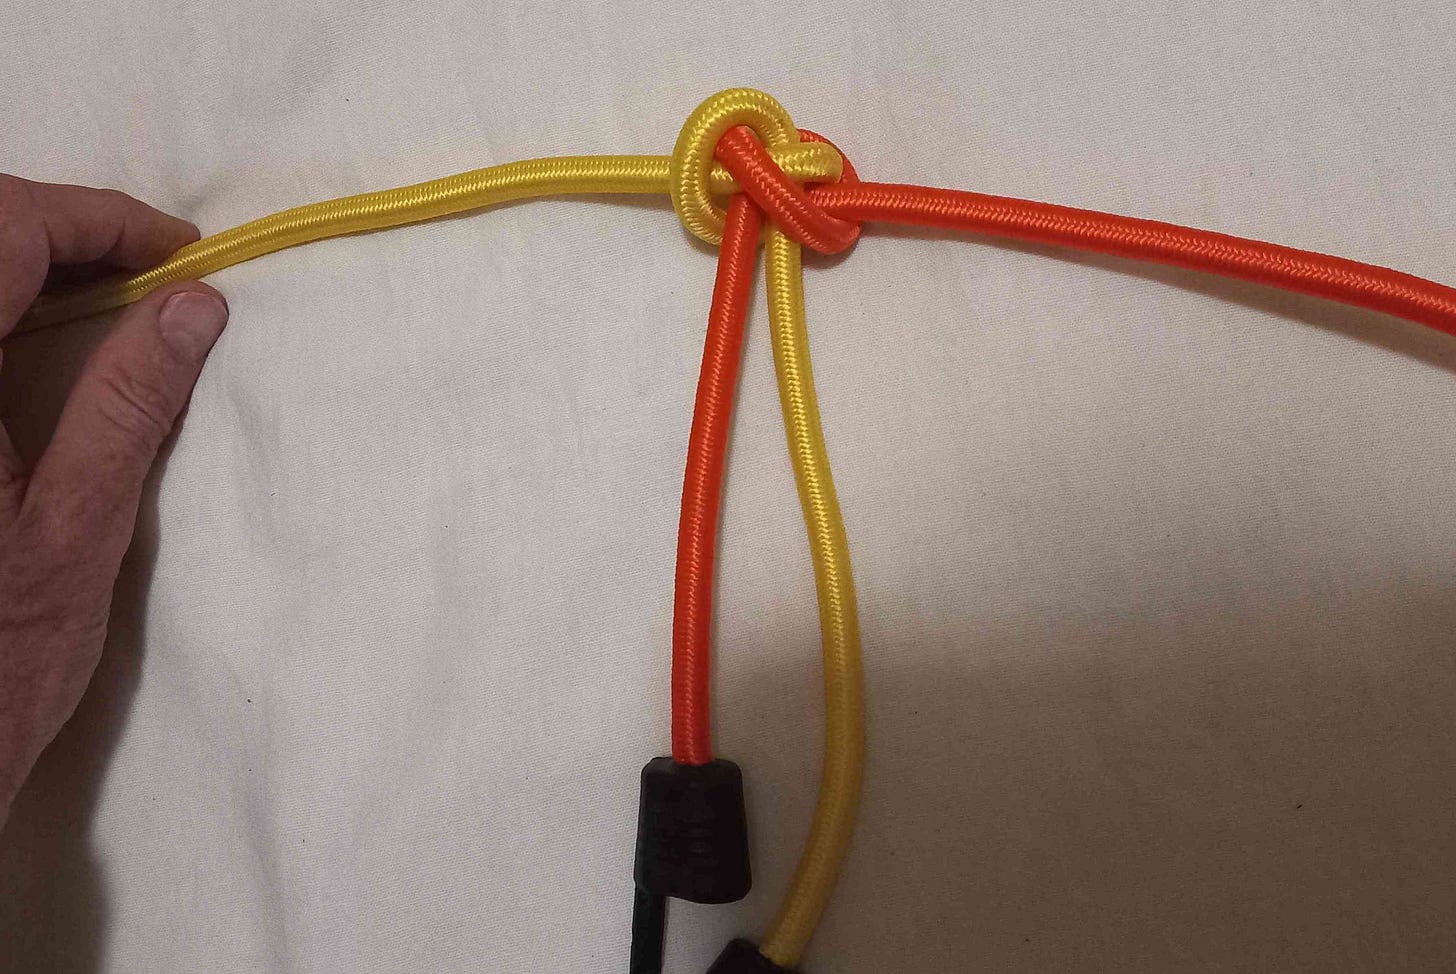
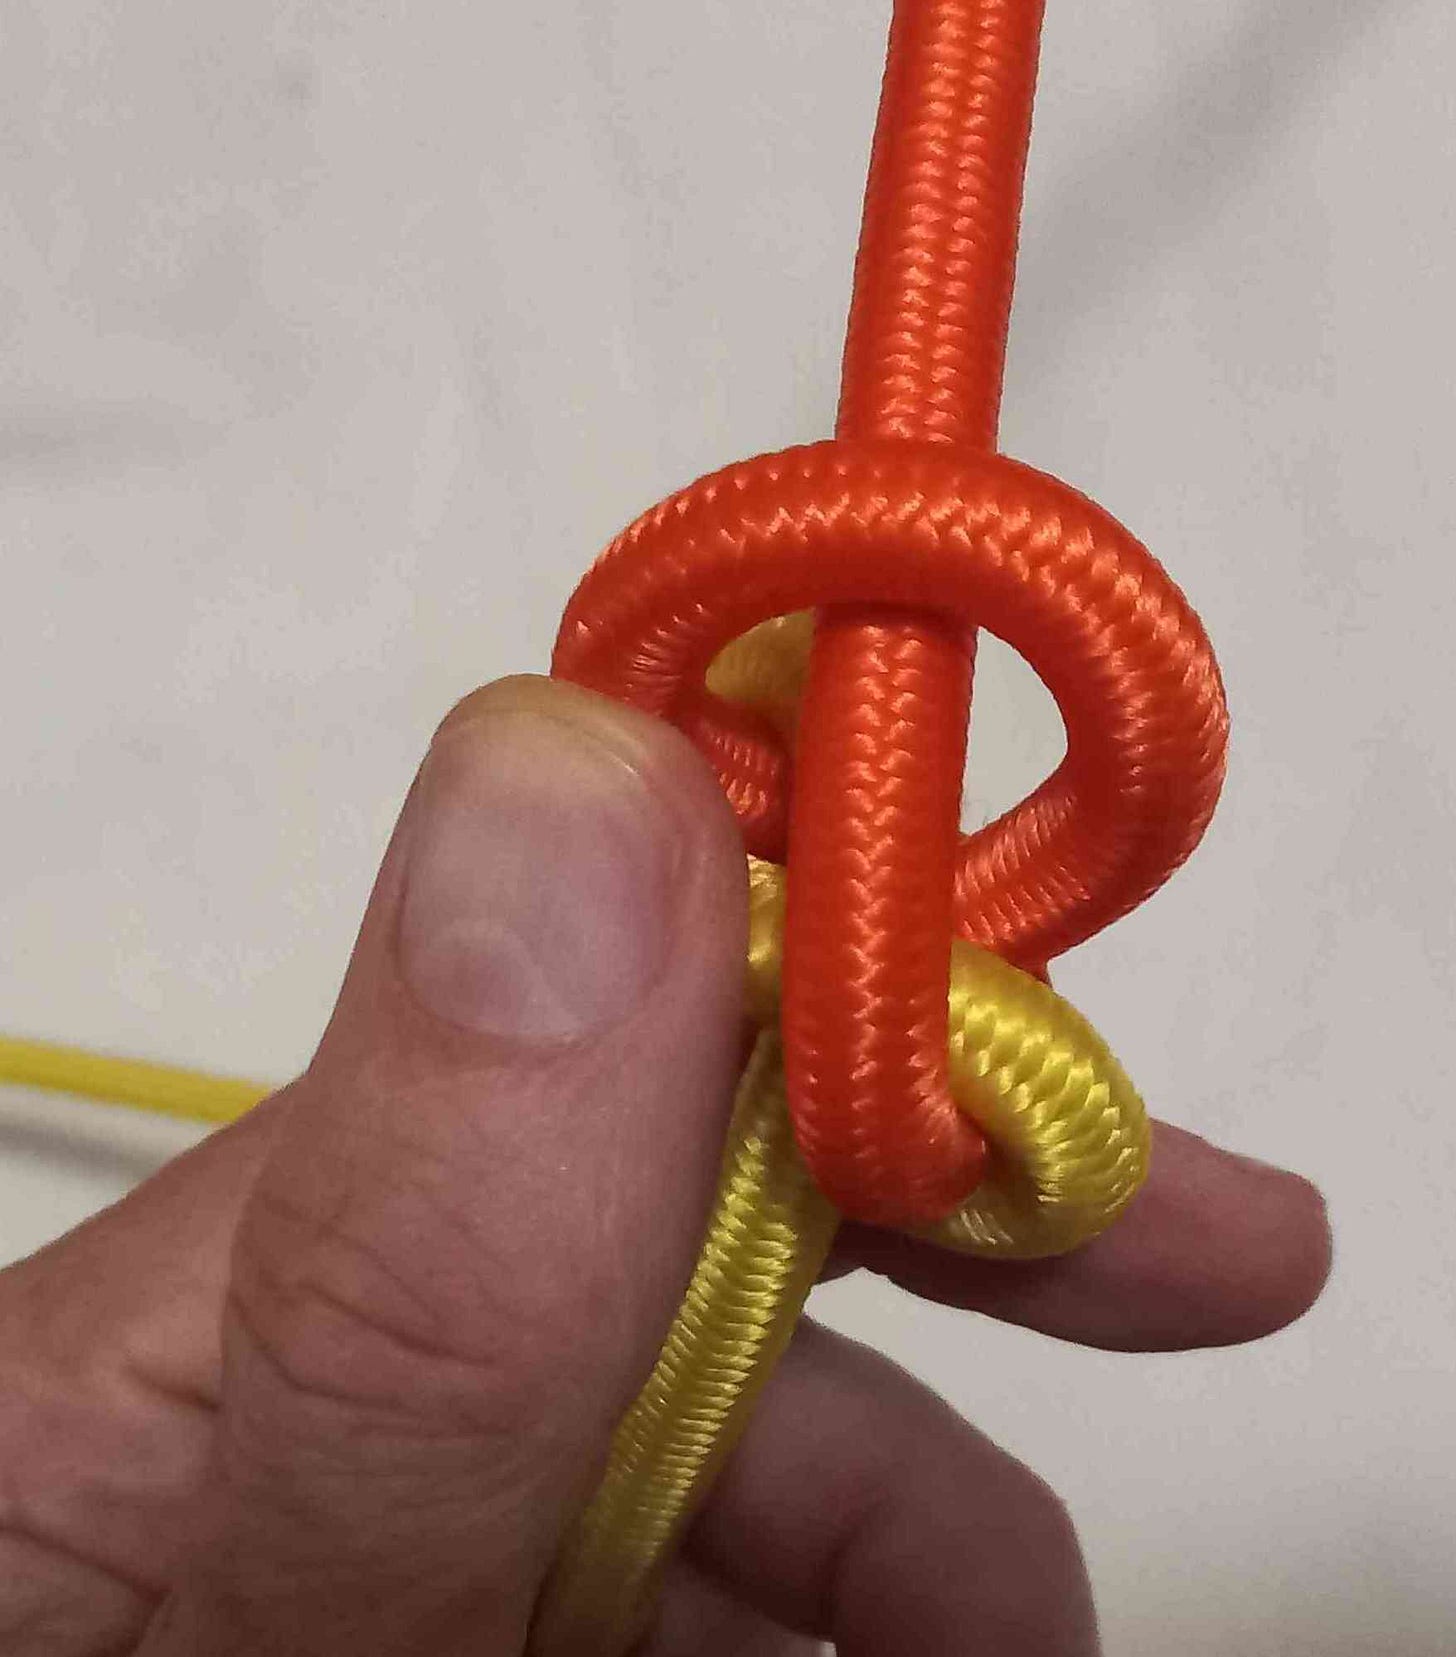
12 (Now you can see why I call this the "Pot-stirrer knot"). Check the situation. Both ends are pointing to the right. Your left hand is holding three rope parts, those are the overhand knot in the left rope, and the right-hand rope. Your right hand is still holding the right-hand rope (its Standing Part).
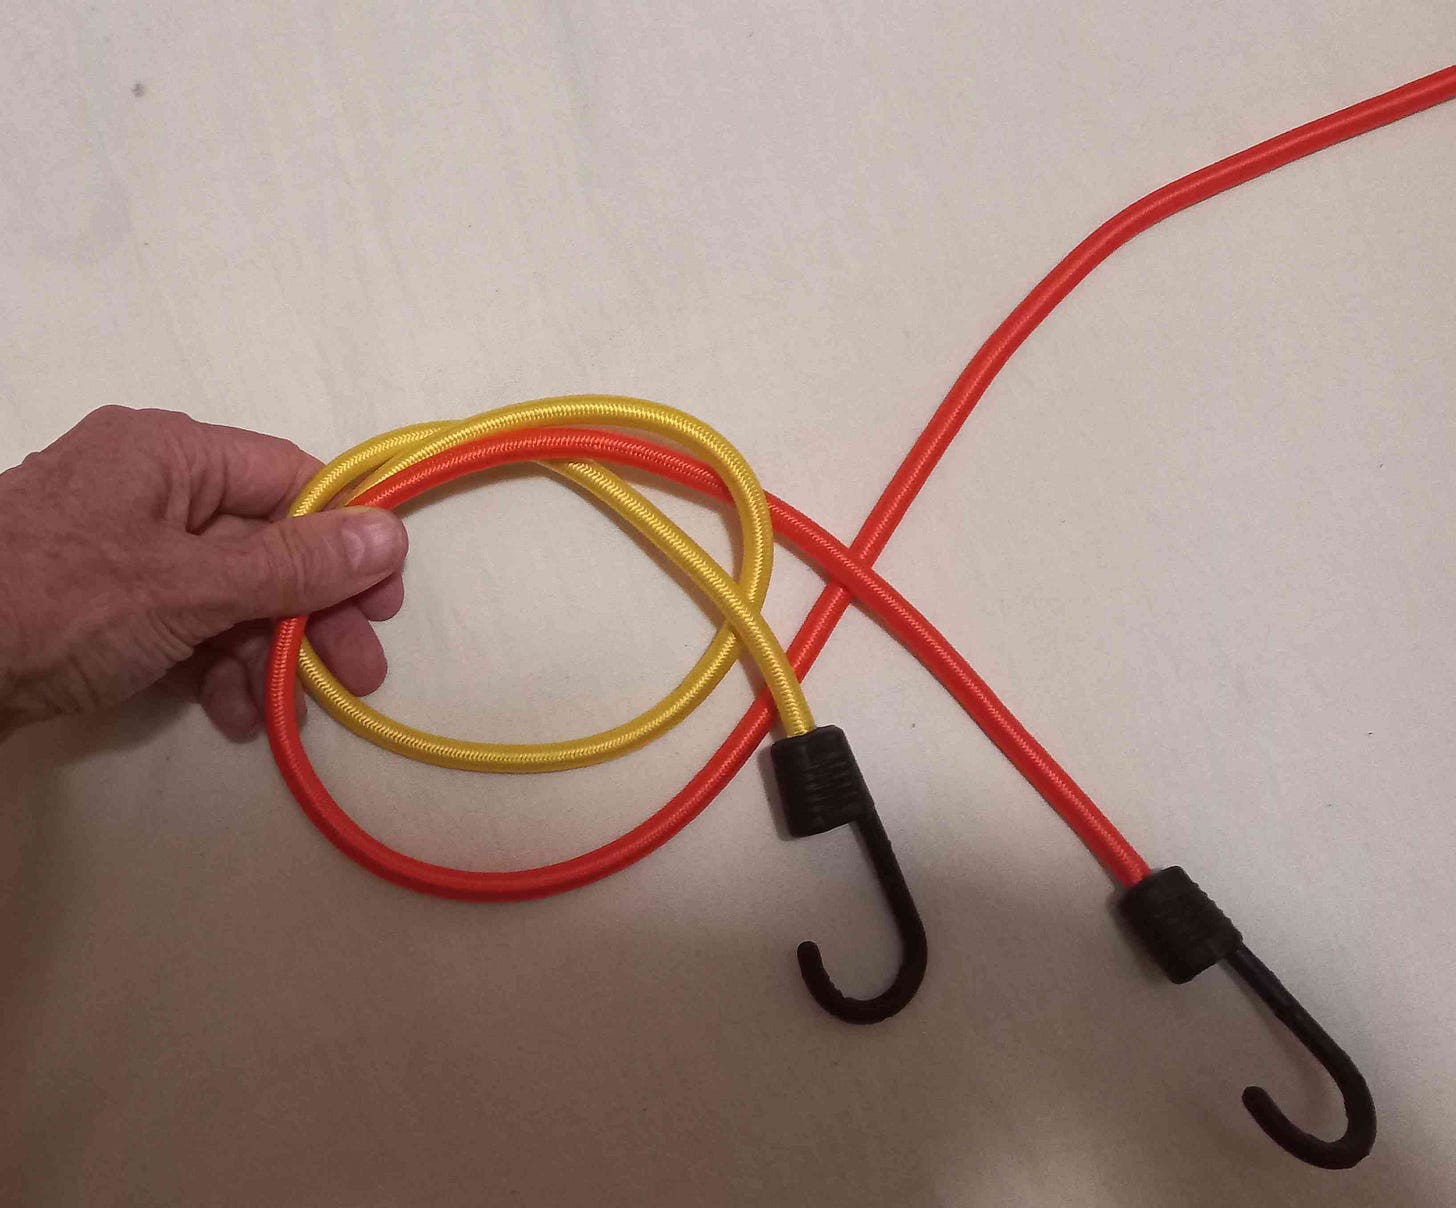
13 Just now (paragraph 11) you passed the right-hand rope under one end; now you're going to pass it under the two ends.
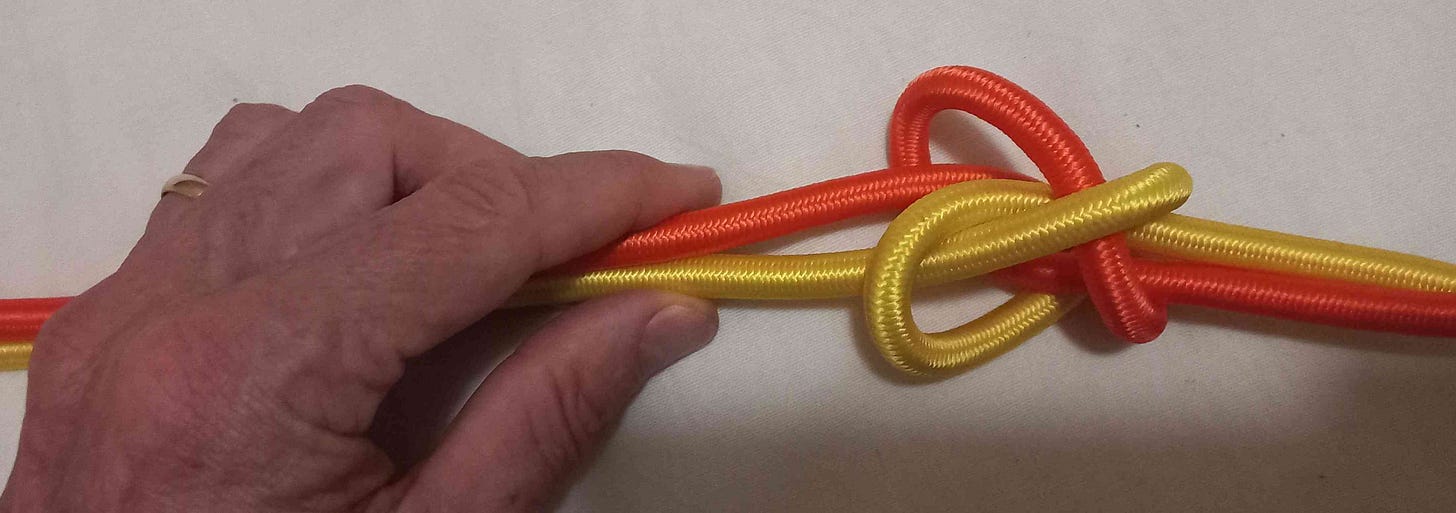
14 Now look at what you have done with the right-hand rope: you are quite close to tying an Overhand Knot in it, aren't you? To complete it, you are going to take the longer end (the right-hand rope's end, remember), bend it down around the standing part of the right-hand rope, and up through both large holes. It should emerge with the other rope end (the short one)
.
15 Pulling tight is primarily done with the two Standing Parts. If you've left nice long End Parts, then probably all you need to do is pull the Standing Parts. But if the ends look like they might slip back through the hole, you could start the tightening by holding a Standing part and an End in each hand. But it is important - so that the knot is able to tighten into the proper form - that all the later pulling tight is done with the Standing Parts only: don't get it too tight before you do this.
16 That all takes MUCH longer to say (or write) than to do. Cutting out all the disambiguation, all you did was
tie an overhand knot in one end
push the other rope through
swing it under one end
grab it as it goes past
swing it under two ends
push the working end through the holes
and pull tight.
Untying
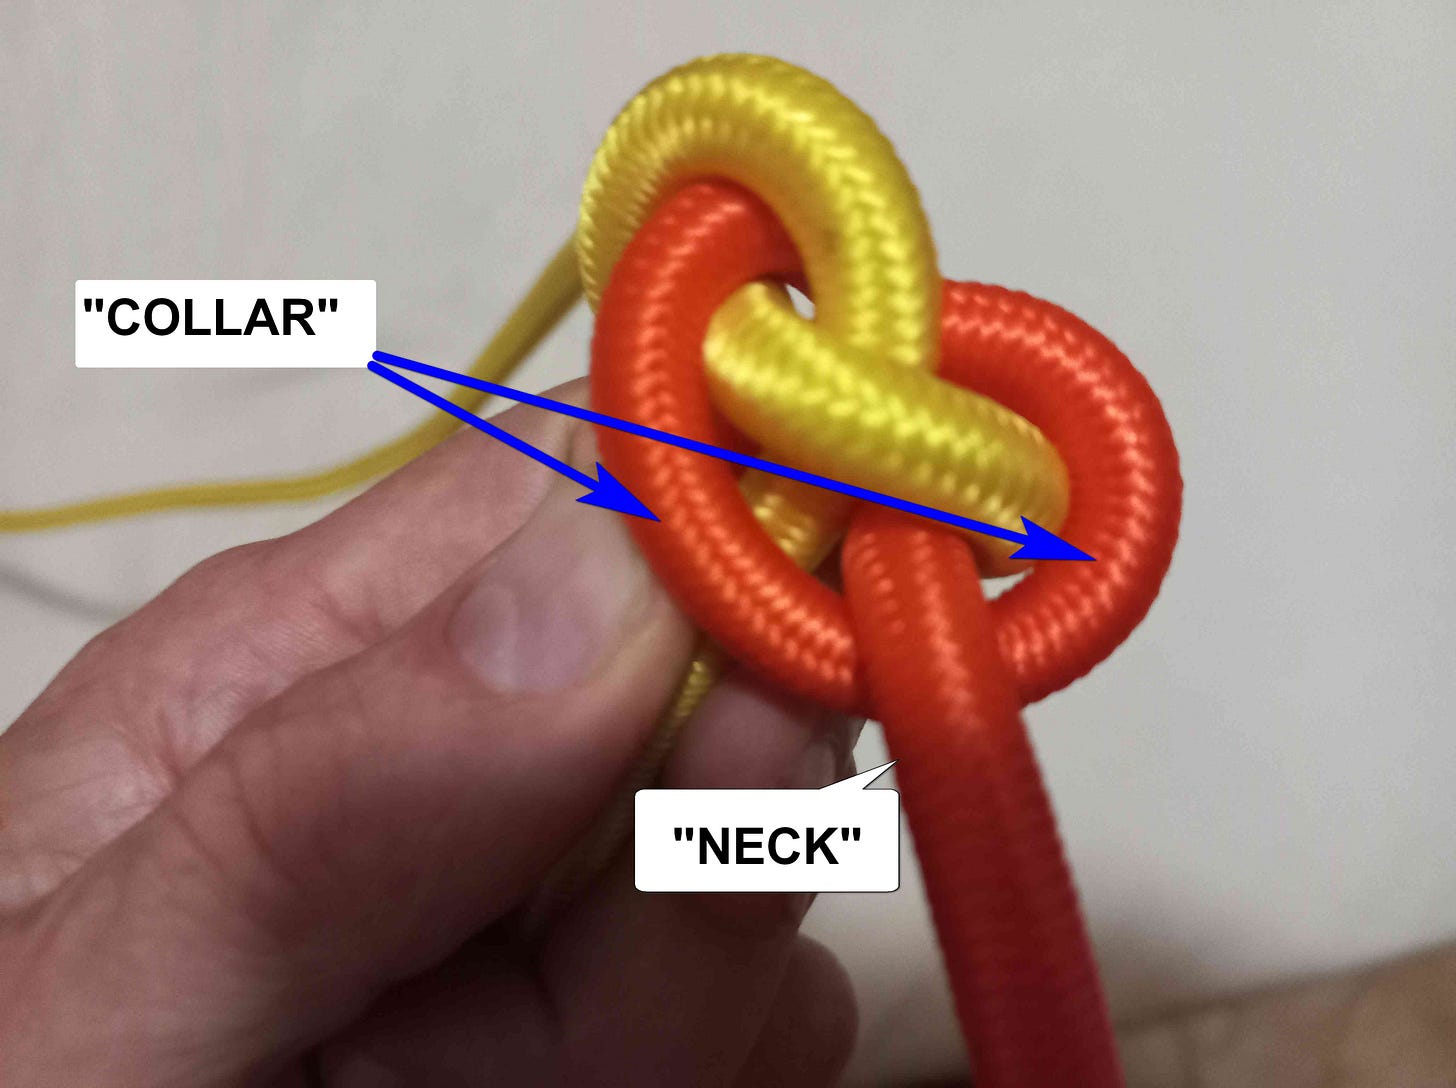
17 Knots which are easy to untie have a particular feature. They have one part which almost straight under tension, while another part curves round it, like an open shirt-collar around a neck. If you hold a Standing Part and dangle the knot beneath your hand, that part you are holding is the "neck", and, looking down at the knot, you will see the collar going round it.
18 If you pull the standing part (the “neck”) away from the “back of the collar",
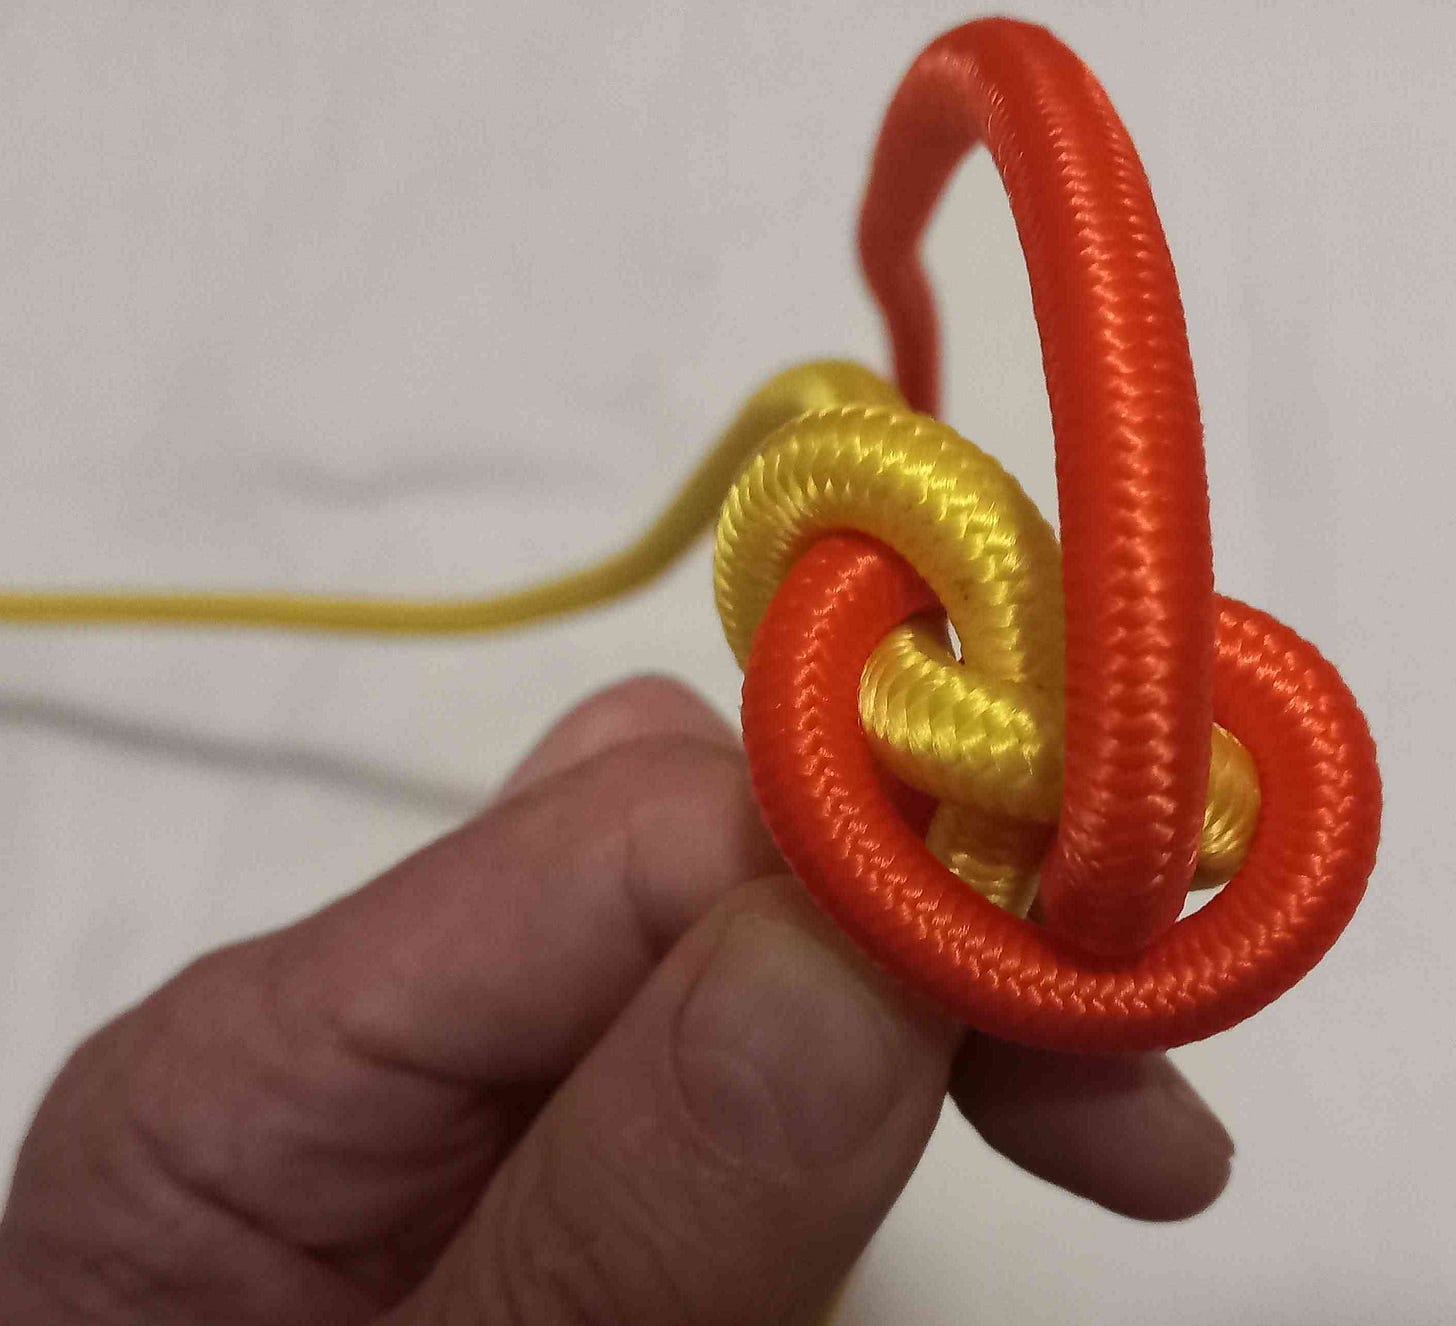
… then you can push up the back of the “collar”, and everything comes loose.
Being symmetrical, you can do this at the opposite end too.
Then hold the two Standing Parts in one hand, and the two End Parts in the other, and push your hands towards each other, loosening everything at once.
Securety
The brilliant feature of this knot which makes it secure, though, (i.e. doesn’t come loose when flapping around) is that there is a slight detent when you push up the "collar". (You know a detent - when you open a car door, there's a point at which it's slightly harder to push the door open, and which tends to hold it open if there's a slight slope. That "difficult bit" is the detent, like a hump to get over).
Even if the knot has been pulled very tight and it’s hard to push the “collar” past that detent, you have a lever to hand to help you: you can use the End Parts as levers.
Give it a try, and see what you think.
For Climbers
The main competitors to the potstirrer knot are the grapevine knot (double fishermans’ bend) and the “flat overhand bend”. Each of the three has advantages and disadvantages.
I would use a grapevine knot for making a rope sling that I have no intention of untying: the grapevine is the most secure.
I’d use the “flat overhand bend” if a particular sort of snagging looked like being a problem, as the off-line structure can help to avoid some types of snagging, as long as the material wasn’t too slippery, as this is a weak knot.
I’d use the potstirrer knot if I needed to be sure of untying it easily.
For Knot Enthusiasts
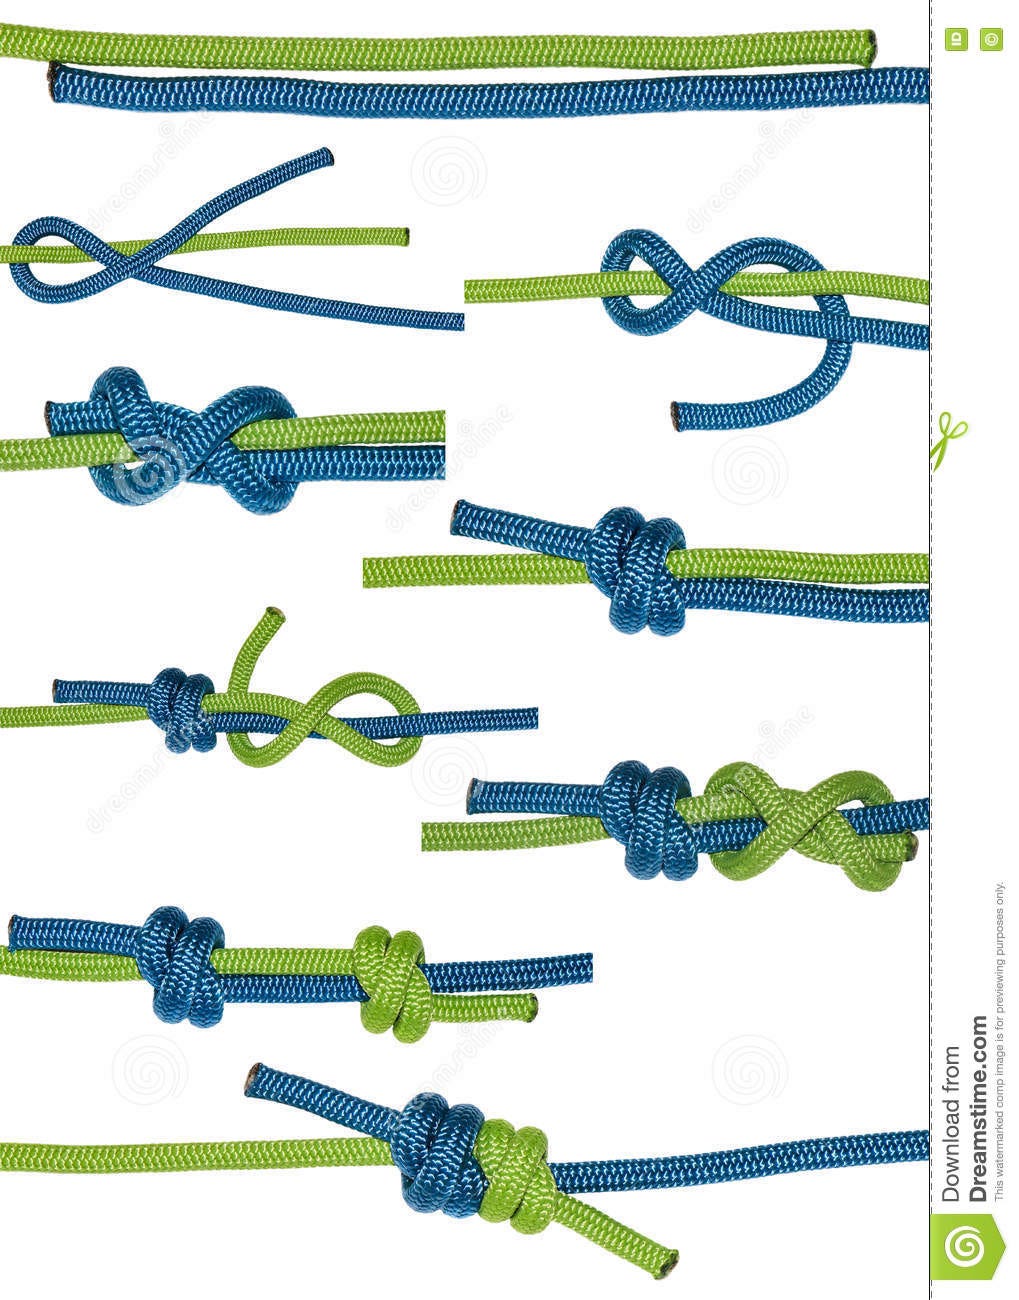
It is closely related to the Alpine butterfly loop (or bend). You can think of the butterfly as the same as this, but with a slight asymmetry deforming it, due to having to tie it “on the bight” (in the case of the loop). The potstirrer is better structurally, but it’s topologically impossible to tie it on the bight. If you try, the nearest you can get is the butterfly.
Clifford Ashley included this bend. I’m going from a forty-year-old memory, as my copy is in the wrong hemisphere at the moment, but he does a collection of overhand knots interlinked in different ways. He includes this one with little to no comment. The method of tying is my devising (so Ashley would have given it another number, just as he gives the sheet bend and the weaver’s knot a different number, despite being different methods of tying the same knot).
UPDATE: This bend is 1452 in the Ashley Book of Knots. You can see a strength-test of this bend (tied in a loop) by HowNOT2 at
https://youtube.com/clip/UgkxIA8UKsbMY6pC6rIbS88Q3DpvOsHv8Mre
That is a 1 minute clip from this video at about 17 minutes in.He is strengh-testing Alpine Butterfly Loops, and testing ways in which it could be tied wrongly. So he includes the pot-stirrer knot structure as a way to tie the Alpine Butterfly Loop wrongly, and finds that the knot does not reduce the strength more than is typical. (All knots reduce the strength of rope). This is a helpful exercise, although no-one would ever tie this by accident as an Alpine Butterfly Loop, as it is not topologically possible to tie it on the bight (that is to say - if you don’t have access to the ends. If you watch him tie it, you will see that he ties it by threading the end of the rope.
He also tests the loop (at around 18 minutes in) - which is helpful: this is the standard way of clipping on to the middle of the rope (i.e. a loop in the middle of the rope. At the end of the rope you can use the structure of the pot-stirrer knot, which I would maintain is better than the Alpine loop. I’ll show the way to do this in a later video.
When he strength tests the loop, he finds that it is the fig. 8 loop at the other end of the rope which breaks first. This is just one test: more would be needed to be more certain.
Just as the sheet bend can be tied as a bowline, making a loop or eye, so can this. It looks like an excellent way to tie on, to me, as it is so easy to untie after a fall. But it’s probably not much better than a figure 8 eye. I’ll make a video about it sometime soon.
Strictly speaking, a knot for joining two ropes together is called a “bend” rather than a knot.
Appropriately enough, this video showing the technique is made by Glenmore Lodge.
For those of you with some knot expertise, this might seem an unpromising start, since there is normally a better knot than an overhand knot for most uses; but you will see.
I’m using terminology that, as far as I can remember, I learned from “The Admiralty Manual of Seamanship”, a Royal Navy text-book.
In usage I'm defining for this article - because people often call a thumb knot an overhand knot - an Overhand Knot is always tied around something: a binding knot. You could tie it with a rope around the neck of a sack for example. That place where the two strands twist around each other bears on something - something which passes through the big hole. When you tie your shoe-laces in the usual bow, the first knot you tie is an overhand knot, and the twist bears against the top of your shoe. After completing your bow, you might tie a Thumb Knot - an Overhand Knot pulled tight on itself - in the end of the lace, in order to stop it from fraying, or accidentally coming out through the lacing holes. You could also think of a reef knot. When you put a reef in a sail you bunch up part of the sail, and bind it: the first overhand knot you tie bears tightly on the bunched up sail, and the friction between the sail and the twist in the two strands is almost enough to hold it in place, requiring nothing more than another overhand knot to secure it. A reef knot (or square knot) is NOT a knot for “joining ropes of equal size” as you sometimes hear; that would still be the sheet bend, in traditional materials. It’s a binding knot (and would indeed use ropes of equal size).





i learned a lot of knots as a boy in sailing lessons but when i stopped it all got forgotten, i'll try and remember this one, i should practice
Thank you for this knot and demonstration.
I can attest to your muscle memory primacy in knot-tying. After a dozen years of stupid rabbit and tree "mnemonics" for tying a bowline, I fumbled the knot when the yard tug I was aboard as a summer student was taking a destroyer 's mooring line. The tug's master told me not to come back Monday if I couldn't tie a bowline with my eyes closed or behind my back. He then spent five minutes putting the muscle memory into me, and it has worked for fifty years.
I will spend some quality time this week with your knot. Thanks again.